Choosing the Right Camera Settings for Sharpness
In photography, capturing sharp images is crucial to producing high-quality results. Whether you’re a beginner or a seasoned photographer, understanding how to take a sharp photo is essential. One of the key aspects of achieving sharpness lies in choosing the right camera settings.
Firstly, it’s important to set a higher shutter speed to eliminate any blurriness caused by camera shake. A faster shutter speed freezes the moment, resulting in a sharper image. This is especially important when photographing fast-moving subjects or in low-light conditions where a longer exposure can lead to blurry photos.
Secondly, adjusting the aperture appropriately can greatly impact the sharpness of your photos. A narrow aperture (higher f-stop number) increases the depth of field, meaning more of the image will be in focus. However, be careful not to set the aperture too narrow as this can introduce diffraction and result in a softer image. Finding the right balance is key.
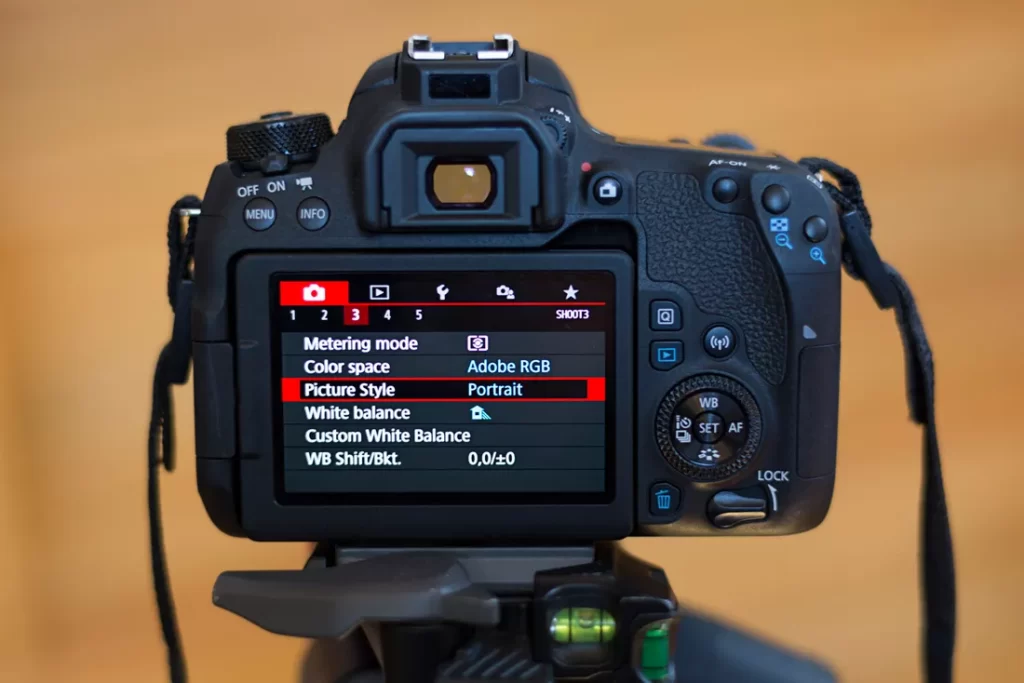
Lastly, setting the appropriate ISO is crucial to minimize noise without sacrificing sharpness. Higher ISO settings introduce more grain and decrease image quality, so it’s recommended to use the lowest ISO possible to maintain the sharpness of your photos, particularly in well-lit environments.
In conclusion, taking sharp photos involves understanding and adjusting key camera settings. Setting a higher shutter speed, choosing the right aperture, and using the appropriate ISO can significantly enhance the sharpness and overall quality of your images. Remember, practice makes perfect, so experiment with different settings to find what works best for you and your photography style.
Using Proper Lighting Techniques for Sharp Images
When it comes to photography, one of the key elements to achieving sharp, crisp images is proper lighting. Without proper lighting techniques, your photos can turn out blurry and lack the sharpness you desire. Whether you’re shooting in natural light or using artificial lighting, understanding how to take a sharp photo is essential for capturing beautiful moments.
One of the first things to consider is the direction of light. For outdoor photography, shooting during the golden hours (the period shortly after sunrise and before sunset) can provide soft, warm light that enhances details and creates a pleasant atmosphere. Avoid harsh midday sunlight as it can cast harsh shadows and result in less sharpness. If you’re shooting indoors or in low light conditions, using a flash or external lighting source can help illuminate your subject and reduce the risk of motion blur.

In addition to lighting direction, proper exposure is crucial for achieving sharp images. Underexposure can result in dark and muddy photographs, making it difficult to capture details. Overexposure, on the other hand, can lead to blown-out highlights and loss of sharpness. It’s important to find the right balance by adjusting your camera settings, such as the aperture, shutter speed, and ISO, to ensure proper exposure for your desired sharpness.
Lastly, having a stable camera is essential for sharp photos. Even the slightest shake or movement can cause blurriness. To minimize camera shake, use a tripod or stabilize your camera against a stable surface. If you don’t have a tripod, try to steady your body by tucking your elbows against your sides and taking a deep breath before clicking the shutter.
In conclusion, mastering proper lighting techniques is crucial for capturing sharp and detailed images. Understanding the direction of light, adjusting exposure settings, and stabilizing your camera will greatly improve the sharpness of your photos. With practice and experimentation, you’ll soon be well on your way to taking stunning, sharp photographs that truly capture the beauty of your subjects.
Mastering Focusing Techniques for Sharpness
In the world of photography, capturing sharp and crisp images is a skill that every aspiring photographer aims to master. Whether you’re a beginner or an experienced photographer, understanding and implementing focusing techniques is crucial in achieving that desired sharpness in your photos. So, how do you take a sharp photo? Let’s delve into some essential techniques.
First and foremost, it’s essential to select the appropriate autofocus mode based on the shooting situation. Most cameras offer various autofocus modes such as single-point, continuous, or zone focusing. Single-point autofocus gives you the precision to focus on a specific subject, while continuous autofocus is ideal for subjects in motion. Zone focusing, on the other hand, allows you to focus on a specific area instead of a single point. Assessing the shooting scenario and selecting the suitable autofocus mode will greatly enhance your chances of capturing a sharp image.
Combined with autofocus mode, determining the right autofocus point is equally crucial. Typically, cameras offer multiple autofocus points, allowing you to choose where you want the focus to be in your frame. In some cases, letting the camera decide the focus point by utilizing auto-selection can be effective. However, for more precise control, manually selecting the autofocus point ensures that your subject is sharp and the rest of the image remains in the desired depth of field.
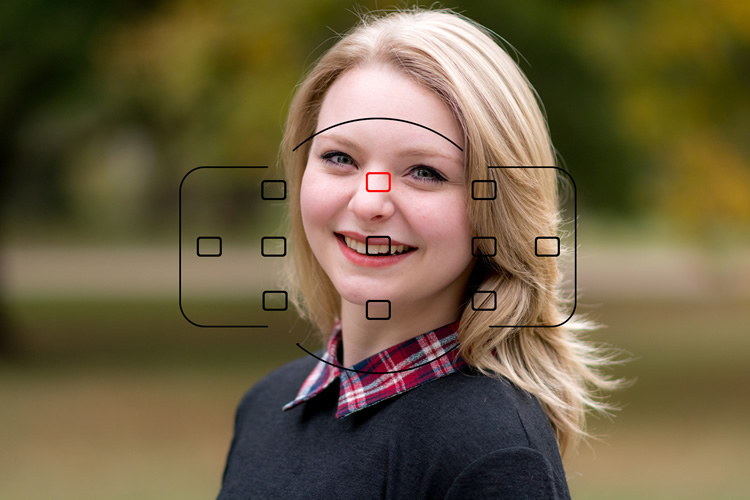
Another indispensable technique in capturing sharp photos is mastering the art of focus and recompose. This technique involves focusing on your subject by keeping it within the autofocus point and recomposing the frame to compose your desired shot. However, it’s important to note that focus and recompose may not be suitable for every situation, particularly with a shallow depth of field or fast-moving subjects. Hence, it’s crucial to practice and adapt this technique according to various shooting scenarios.
In conclusion, taking sharp photos requires understanding and implementing effective focusing techniques. By selecting the appropriate autofocus mode, determining the right autofocus point, and mastering focus and recompose, photographers can greatly improve their chances of capturing sharp and exceptional images. So, equip yourself with these techniques, practice, and be prepared to produce stunning photographs that leave a lasting impact on viewers.
The Importance of Stability in Achieving Sharp Photos
Achieving sharp and clear photos is the goal of every photographer. Whether you are capturing a stunning landscape or capturing a memorable family moment, sharpness plays a vital role in the overall quality of the image. One of the key factors to consider in obtaining sharp photos is stability.
Stability refers to the technique used to minimize camera shake and unwanted motion during the photo-taking process. Without stability, the risk of blurry and out-of-focus images significantly increases. To ensure sharpness, there are several methods to consider.
Firstly, it is important to hold the camera steady. This may seem obvious, but even the slightest movement of your hands can result in a loss of sharpness. It is recommended to hold the camera with both hands, keep your elbows close to your body, and stand with your feet shoulder-width apart for a stable base.
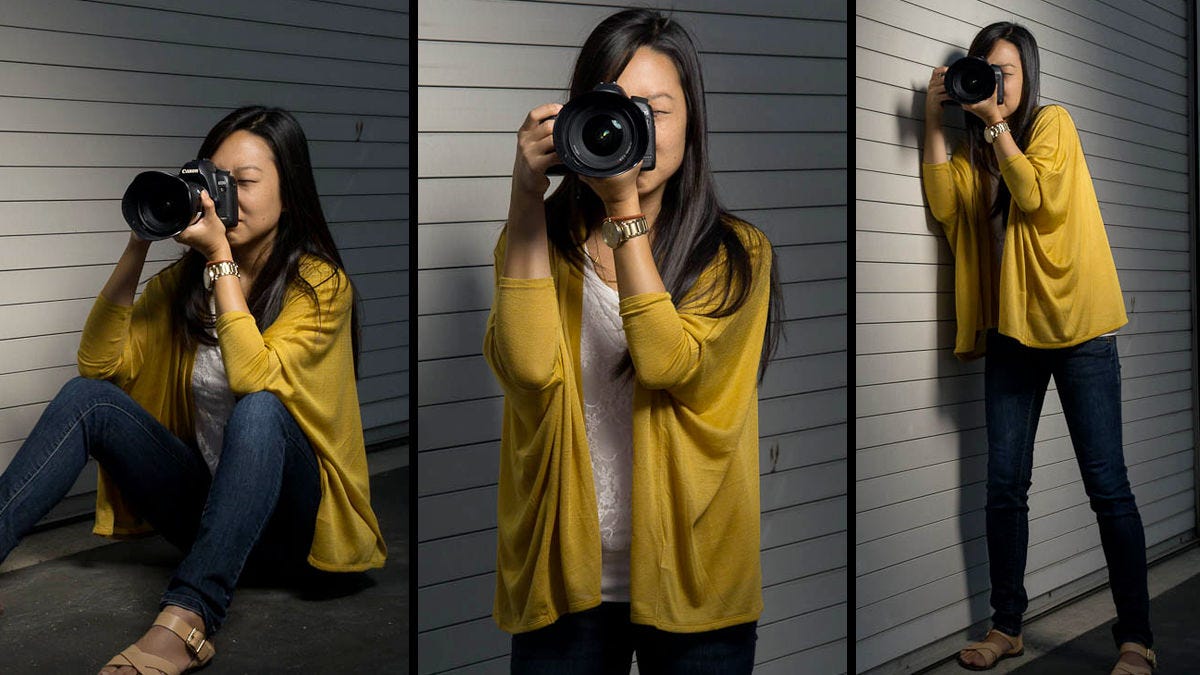
Another essential technique is to use a tripod or a stable surface to support your camera. A tripod not only eliminates camera shake but also allows you to compose your shots with precision. Additionally, if you’re unable to use a tripod, utilizing objects like walls or tables can serve as makeshift stabilization tools.
Furthermore, if you find yourself shooting in low light situations where slower shutter speeds are necessary, using a remote shutter release or the self-timer function on your camera can help minimize camera movement caused by manually pressing the shutter button.
In conclusion, stability is the key to obtaining sharp photos. A combination of handholding techniques, using a tripod or stable surface, and utilizing remote shutter releases can greatly enhance the clarity and sharpness of your images. So, the next time you’re wondering how to take a sharp photo, remember the importance of stability and incorporate these methods into your photography practice for impeccable results.
Post-Processing Tips for Sharpening Your Images
In the world of photography, capturing sharp images is a key goal for many photographers. However, even the best of photographers may find that their images need a little extra touch to bring out the desired level of sharpness. This is where post-processing sharpening comes into play. By making use of various techniques and tools, you can enhance the sharpness of your images and give them that crisp, professional look.
So, how can you take a sharp photo in the first place? It all starts with proper focusing. Make sure to use autofocus or manual focus techniques to ensure that your subject is sharp and in focus. Additionally, using a tripod or stabilizing your camera can help eliminate any accidental camera shake that may result in blurry images.
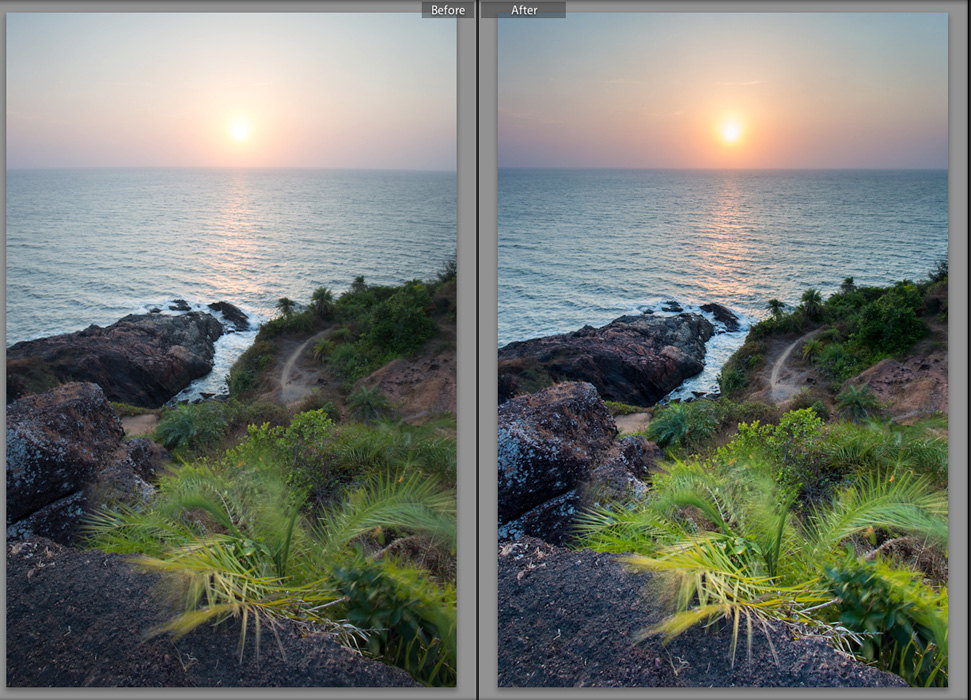
Once you have taken your well-focused photo, the next step is post-processing. One popular tool for sharpening images is Adobe Photoshop. With Photoshop, you can sharpen your images using tools such as the Unsharp Mask or the Smart Sharpen filter. These tools allow you to adjust the amount, radius, and threshold of sharpening to achieve the desired level of sharpness.
Another option for post-processing sharpening is to use specialized software such as Topaz Sharpen AI or Nik Sharpener Pro. These tools utilize artificial intelligence algorithms to analyze and enhance the sharpness of your images. They provide advanced controls and presets to help you achieve a professional-level result.
In conclusion, capturing a sharp photo is essential for creating visually pleasing images. By following proper focusing techniques and utilizing post-processing sharpening tools, you can elevate the sharpness of your images to the next level. Experiment with different methods and find the one that best suits your style and desired outcome. Remember, practice makes perfect, so keep refining your skills and techniques to achieve the sharpest images possible.
Enhancing Sharpness With Composition and Framing
Photography is all about capturing moments in the sharpest and most detailed way possible. While technology has made significant advancements in camera lenses and autofocus systems, photographers can still enhance the sharpness of their photos by focusing on composition and framing. Understanding how to take a sharp photo goes beyond just the technical aspects of the camera; it involves mindful and deliberate decisions about how to arrange the elements within the frame.
One key aspect to consider is the rule of thirds. By dividing the frame into nine equal parts using two horizontal and two vertical lines, photographers can identify four points where these lines intersect. Placing the main subject or point of interest in one of these intersections, rather than at the center of the frame, can create a more visually appealing and impactful composition. This technique not only guides the viewer’s attention but also adds a sense of balance and harmony to the photograph.
Another way to enhance sharpness is by paying close attention to the background. A cluttered or distracting background can draw attention away from the main subject. By utilizing a shallow depth of field or choosing a different perspective to blur or eliminate any distracting elements, photographers can bring the focus to the main subject and create a cleaner and more compelling image. Additionally, incorporating leading lines or frames within the frame can help guide the viewer’s eye towards the subject, further enhancing the overall sharpness and impact.

Lastly, proper framing can play a crucial role in capturing sharp photos. Instead of mindlessly pointing and shooting, photographers should take their time to consider the elements within the frame and how they interact with each other. By carefully composing and framing the shot, photographers can control the visual flow and create a sense of depth and dimension within their photographs. This thoughtful approach not only brings out the sharpness but also adds layers of visual interest that engage the viewer.
In conclusion, enhancing the sharpness of photos goes beyond just technical settings on the camera. By focusing on composition and framing, photographers can create more visually appealing and impactful images. Utilizing the rule of thirds, paying attention to the background, and crafting the frame with intent can all contribute to capturing sharp photos that leave a lasting impression. So, the next time you’re out with your camera, don’t forget to consider these elements and watch your photos come to life with enhanced sharpness.
Troubleshooting Common Issues with Blurry Photos
Taking sharp photos is an essential skill for any photographer. However, even the most experienced photographers can run into issues with blurry photos. Blurriness can be caused by a variety of factors, including camera shake, incorrect focus, and motion blur. Fortunately, there are several troubleshooting techniques that can help you capture clear and sharp photos.
One common cause of blurry photos is camera shake, which occurs when the camera moves during the exposure. To avoid this issue, it’s important to hold the camera steady while taking the shot. You can use a tripod or place the camera on a stable surface to minimize any movement. Additionally, using the camera’s image stabilization feature can help reduce camera shake.
Another factor contributing to blurry photos is incorrect focus. Ensure that the auto-focus mode is selected on your camera, and try focusing on the subject by half-pressing the shutter button. If the camera struggles to focus, you may need to manually adjust the focus point. Additionally, adjusting the aperture to a smaller value (larger F-numbers) can increase the depth of field, resulting in a sharper image.
Motion blur is yet another issue that can cause blurriness in photos. Fast-moving subjects or camera movement during long exposures can result in this blur. To overcome this, you can increase the shutter speed to freeze the subject’s motion or use a faster lens to allow for quicker exposure times. It’s also important to keep your own body still while taking photos, especially when using slower shutter speeds.
In conclusion, troubleshooting the common issues behind blurry photos can significantly improve the sharpness of your images. Remember to minimize camera shake by using a tripod or holding the camera steady. Pay attention to the focus of your shots, ensuring that the camera is focused correctly. Lastly, be aware of any motion blur and adjust shutter speed or lens choice accordingly. By implementing these techniques, you’ll be well on your way to capturing clear, sharp, and stunning photographs.
Advancing Your Skills: Advanced Techniques for Sharp Photography
Capturing sharp photographs can be a challenging task, but with the right techniques and practice, it is definitely achievable. Whether you are a professional photographer or just an enthusiastic beginner, there are several advanced techniques that can help you take crisp and sharp photos.
Firstly, focus on the subject. Keep in mind that the sharpest part of your photo should always be the main subject. To ensure this, use the autofocus feature on your camera or manually focus on the subject. Take your time to compose the image, making sure the subject is in focus and any distracting elements are minimized. Using a smaller aperture (higher f-number) can also help increase the depth of field, resulting in a sharper overall image.
Secondly, stability is key. Any tiny movement of the camera can lead to blurry shots, especially when shooting with longer focal lengths or slower shutter speeds. To counteract this, use a tripod or rest your camera on a stable surface. If a tripod is not available, try bracing yourself against a wall or using the camera strap as a makeshift stabilizer. Additionally, using a remote shutter release or the self-timer function can eliminate camera shake caused by pressing the shutter button.
Lastly, pay attention to the lighting conditions. Adequate lighting is crucial for sharp photography. Shoot in well-lit environments to minimize noise and achieve sharper images. If shooting in low light situations, consider using a higher ISO sensitivity to maintain a faster shutter speed. However, be cautious not to increase the ISO too much, as it can introduce digital noise into the image.
In conclusion, obtaining sharp photographs requires a combination of technical knowledge and practice. By focusing on the subject, stabilizing your camera, and optimizing lighting conditions, you can greatly improve the sharpness of your photos. Experiment with these advanced techniques and don’t be afraid to make mistakes; it’s through trial and error that we grow as photographers. So grab your camera and start capturing those crisp and sharp shots!
Taking Your Photography to the Next Level: Tips for Consistently Sharp Images
Taking sharp and crisp photos is a goal every photographer strives for. Whether you’re a beginner or a seasoned pro, achieving consistently sharp images can greatly enhance the impact of your photographs. But how exactly can you capture that level of sharpness? Here are some valuable tips to help you take your photography to the next level and consistently obtain sharp shots every time.
First and foremost, pay attention to your focusing technique. One of the key elements in capturing sharp images is ensuring that your subject is in focus. Make use of the autofocus feature on your camera, but also be aware of its limitations. It’s essential to understand how to manually select the focus points and adjust them according to your subject. Taking the time to fine-tune the focus can make a remarkable difference in the sharpness of your photographs.
Another crucial aspect of achieving sharper images is using the right aperture. A small aperture (represented by a high f-number) helps to increase the depth of field, which means more of your image will be in focus. Avoid shooting at wide apertures (low f-number) as it can result in a shallow depth of field and a narrower area of focus. Experiment with different aperture settings to strike the right balance between capturing the desired depth and sharpness.
Additionally, ensuring steady camera stability is vital for sharp images. Invest in a tripod or stabilize your camera with other means if handheld shooting isn’t feasible. Even a small amount of camera shake can cause blurriness in the final results. Utilize the camera’s timer or a remote shutter release to minimize any movement caused by pressing the shutter button.
In conclusion, achieving consistently sharp photos requires attention to detail and understanding the technical aspects of photography. Experiment with different focusing techniques, make use of the appropriate aperture settings, and employ camera stabilization methods to enhance your chances of capturing tack-sharp images. Remember, practice makes perfect, and with time and persistence, you’ll be able to elevate your photography to the next level and consistently achieve sharp and stunning results.